Next, we are going to delve into the DR vertical X-ray film holder. Last week, we jointly explored the relevant knowledge of the wall-mounted X-ray film holder. Now, let’s review its core components again. The wall-mounted X-ray film holder mainly consists of a film tray assembly and a pair of tracks. Its design is flexible and adaptable, capable of meeting the usage requirements of different sizes of ordinary X-ray film holders, CR film holders, and DR flat panel detectors.
01
Overview of the DR Vertical Chest X-ray Stand
► Introduction and Functions
The DR Vertical Chest X-ray Stand, a device specially designed for medical institutions, can efficiently take X-ray images of various parts of patients, including the head, chest, abdomen, and pelvic area, by ingeniously combining with medical X-ray machines. This helps doctors accurately diagnose various lesions. Its common name is X-ray Stand, while the trade name is more specific – DR Vertical Chest X-ray Stand. Moreover, this X-ray stand has wide applicability and can easily adapt to different sizes of DR flat-panel detectors, CR IP plates, and dark boxes, providing comprehensive support for medical diagnosis.
► Adaptability and Technical Parameters
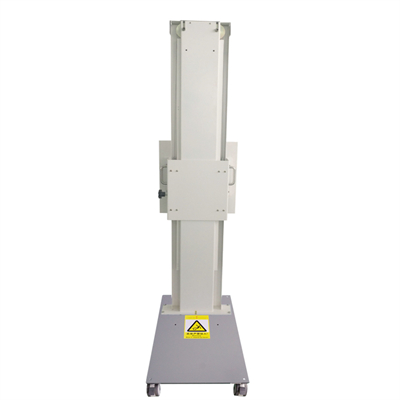
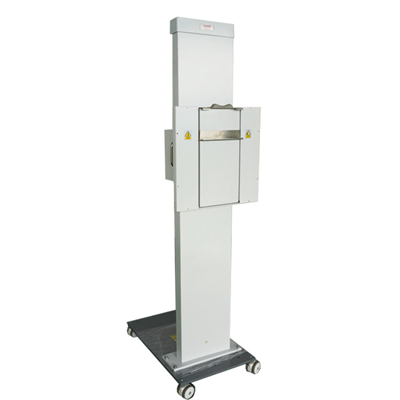
The DR vertical radiography stand is mainly composed of several meticulously designed components such as the upright column, sliding frame, film box, and balancing device. Each component is meticulously manufactured to ensure the stability and durability of the equipment. This device not only has a delicate structure but also possesses a series of important technical parameters, such as maximum load capacity, movement range, and accuracy, which collectively guarantee the efficiency and accuracy of the radiography examination. The up and down movement range of the film box can reach 1100mm, meeting various radiography requirements. Ensuring that the center of the DR flat panel detector and the center of the film box are always within ±5mm in the left-right and up-down directions, the radiography accuracy is guaranteed. Within the travel range of the film box, the left-right deviation of the center point is also strictly controlled within ±5mm, further optimizing the radiography effect. To adapt to different sizes of DR flat panel detectors, CR IP plates, and dark boxes, the equipment is designed with corresponding accommodating spaces. The maximum size of the DR flat panel detector is 17″×17″, while the maximum size of the CR IP plate/dark box is also 17″×17″, flexibly meeting various examination needs.
02
Installation and Usage
► Installation Steps
Firstly, place the DR vertical chest radiography stand steadily on a hard surface approximately 180cm away from the X-ray tube, ensuring that the vertical center of the cassette precisely coincides with the center of the X-ray tube. After adjustment, align the four 11mm diameter holes at the bottom of the device column with the center of the stand. Use an electric drill to make the holes and install four expansion screws. Finally, tighten the screws to ensure stability.
► Operation and Usage
When using the DR vertical radiography stand, we will take the DR flat panel detector as an example to introduce its operation steps. First, ensure that the radiography stand is correctly installed and firmly placed on a hard surface. Then, place the DR flat panel detector steadily on the cassette and adjust its position to be precisely aligned with the center of the tube. Next, follow the operating procedures to take the radiograph, ensuring that the detector can accurately capture the image of the chest. After the radiograph is taken, promptly remove the film from the detector and carry out subsequent processing.
Before conducting the X-ray film examination, we first need to correctly insert the selected DR flat-panel detector into the film holder. This requires aligning the center line of the detector with the center gap of the slot precisely, then smoothly pushing the detector into the film holder and releasing it. At this point, the DR flat-panel detector will self-lock and secure its position firmly. Next, based on the specific area of the X-ray examination, we select the appropriate examination conditions and adjust the suitable height of the DR flat-panel detector accordingly. After completing these preparation steps, the X-ray film examination can be carried out.